
When my husband Bill was young, his Grandma Bates often came to visit the family over the holidays. He has fond memories of delicious homemade rolls and his Grandma singing “Jesus loves me this I know for the Bible tells me so…”. Between songs and fresh rolls, Grandma Bates also used to take Bill on walks around the neighborhood. I love the way special recipes can evoke such fond memories. Although Grandma Bates has long since passed away, her memories and traditions live on in our family!

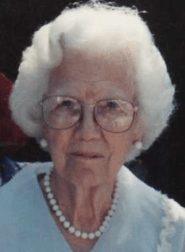
My Grandma Nellie made amazing rolls for holidays too – scrumptious, fluffy, little pillows of delight that were the closest thing to heaven in my young world. A wonderful baker and cook, Grandma also loved birds, nature and doing family history. I loved helping her hand print family group sheets while eating her delicious rolls! It’s been years since Grandma passed away but I was able to get her recipe from my Aunt. Unfortunately, it didn’t include detailed instructions so I’ve had to do quite a bit of research and practice to come even close to the original. I sure do miss my sweet Grandma (and her rolls)!
As I tested both recipes, I decided to combine them, using the best ingredients and techniques from each. Grandma Bates used to roll out her dough, cut it into circles, then fold them in half with a pat of butter. Grandma Nellie made round balls that attached to one another while rising. The recipes were slightly different as well with Grandma Bates’ calling for 3 eggs, milk and butter while Grandma Nellie’s called for 1 egg, water and shortening. Three eggs made the dough too yellow and dense. All water didn’t seem rich enough. And shortening? Definitely not using trans fats. So I took the best of both recipes to make Grandma’s Rolls!
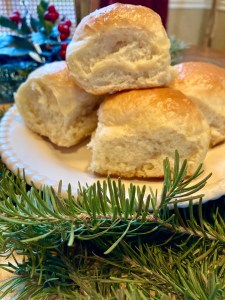
I have to say that this combined roll recipe came out perfectly and took me right back to Grandma’s kitchen! The smell, the taste and the satisfaction are hard to describe. In fact, after eating two rolls, it took all of my self-control to stop!

From heaven to our table, these wonderful women inspire our imagination and stir our memories of years gone by with this delicious family tradition! An authentic Family Food Roots story and recipe, I hope you enjoy Grandma’s Rolls as much as we do!
Grandma’s Rolls
- 1 package yeast (or 2 ¼ tsp)
- 1 cup lukewarm water
- 1/4 cup sugar
- 1 cup lukewarm milk
- 1 beaten egg
- 2 tsp salt
- 3 T melted butter
- 5-6 cups flour, divided
Place yeast, sugar and 1 cup lukewarm water (100-110º) in a bowl. Mix to combine and let sit until frothy, 5-7 minutes. Pour yeast mixture into mixing bowl of a stand mixer. Add 1 cup lukewarm milk (not too warm or the yeast will die). Add the beaten egg, salt and melted (cooled) butter; mix to combine.
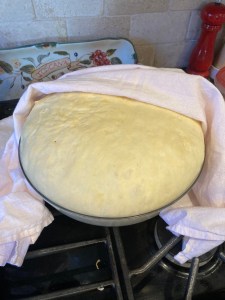
Beat in 1-2 cups flour and let it stand until dough forms a light sponge (just until it starts bubbling), then add the rest of the flour. According to my Grandma Nellie, this seems to speed up the process and produce lighter rolls. Then add the rest of the flour to equal 5 cups and mix the dough in the stand mixer using either the paddle or dough hook for 3-5 minutes. Put dough on a floured surface and finish kneading by bringing the edges to the middle, then rotating a few times. Add more flour if the dough is too sticky. I found that 5 1/2 cups was perfect. To determine if kneading is complete, press a finger into the dough; if it bounces back, it’s ready. Grease a glass bowl with butter or olive oil and add dough. Covering the bowl with plastic wrap or using a container with a lid is best but I did it the old fashioned way with a light dish towel.
Let dough rise in a warm place for 60-90 minutes or until double in size (see Root Notes for dough rising tips). You can imagine my surprise when I lifted the towel and my dough had actually risen! I think I may have done a happy dance…
Once dough has doubled in size, punch down and form rolls using one of these two methods:
Grandma Bates:
Pour dough onto a rolling tarp. Roll to ¾” thick and cut into rounds. Pat with butter, crease with knife, fold in half and place on parchment paper lined jelly roll pan or cookie sheet. Let rise until double in size.
Grandma Nellie:
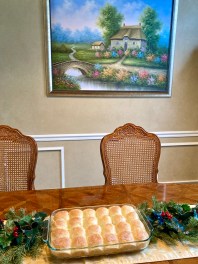
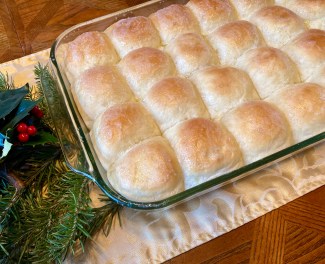
Pour dough onto a rolling tarp. Cut and roll into balls of equal size , tucking dough under until balls are smooth on top. One way to determine size is to weigh the dough (after initial rise), then divide by however many rolls you want to make and whatever size pan you have. For this method, I used a 9×13″ pan as the sides provide a nice support for a higher rise. I weighed the dough at 46.8 ounces after the first rise and punching down. In my test, I made 24 perfect sized rolls weighing about 1.95 ounces each in 6 rows of 4. For 30 smaller rolls, divide dough into1.56 ounces each in 7 rows of 5. You get the idea!

Bake at 375º for 18-20 minutes or until golden brown. Remove rolls from oven, brush with butter and be prepared for a heavenly experience!
Root Notes
Because I’ve been ‘yeast challenged’ my entire life, I researched some roll making tips, which really did pay off…
- If you choose to knead your dough by hand, I found some tips from Le Cordon Bleu which were helpful. Place the dough on a lightly floured work surface. Fold the dough onto itself and give it a quarter turn. Using the heel of your hand, push the dough forward. Fold the stretched dough over itself and give it a quarter turn again. Push the dough again with the heel of your hand, fold and turn.
- I always thought covering the dough with a dish towel like Grandma did was the way to go. But covering with plastic wrap is more successful because yeast loves a warm and humid environment. Moisture keeps the surface of the dough soft which promotes a better rise. A snap on lid is even better because it traps the moisture (like this container which also has measurements).
- Turn oven light on one hour in advance, which gradually rises the oven temperature to about 76º. Put the dough in, leave the light on for another 30 minutes or so, then turn the light off, allowing the temperature inside to reverse its course. (This is the one I did and it worked perfectly!)
- Set oven to lowest temperature for 2 minutes, then turn it off. Place dough inside and leave oven door slightly ajar.
- Heat 2 cups of water in your microwave until boiling (takes about 3 minutes). Wait about 45 minutes for microwave temperature to come into range. Exchange the bowl of water for the dough (uncovered) and quickly close the door. The interior temperature of your microwave will start out in the mid-to low-80’s and will drop down to the 70’s over the next hour or so, providing an ideal rising environment.
- Place bowl of dough on top of your water heater or refrigerator; or on a high shelf as heat rises and major appliances which run constantly are usually a bit warmer than the surrounding air.
- Fill a glass baking dish with boiling water and place on the bottom rack of the oven. Place dough on the middle or top rack and shut the oven door.
- Place dough on top of a heating pad set to low. Wrap the heating pad in a heavy bath towel to prevent too much heat from cooking the bottom of the dough.
Resources:
Most of the tips above came from kingarthurbaking.com. But these other sites were also super helpful to me as I worked to improve my roll making skills:
tastesoflizzyt.com
tasty.com
momontimeout.com
lilluna.com

I needed this. We love rolls but I struggle with them. Thank you!
Thanks Julie! I struggle too so this has been quite the journey over here!